Xilisoft AVI to DVD Converter for Mac Tutorial
Xilisoft AVI to DVD Converter for Mac allows you to convert files in AVI, MPEG, VOB, DAT, M2V, MPG format to DVD movies and burn them onto DVDs. Here is a quick step-by-step guide to get you started.
Part 1: Getting Started
Part 2: Customize Video Files
First, download, install and launch Xilisoft AVI to DVD Converter for Mac.
How to burn/convert AVI to DVD disc on Mac computer step by step?
Here, we will show you the simplest and the quickest way to create a DVD from video files.
Step 1: Load video files
Click the "Add Video File(s)" button on the Toolbar or select "File > Add Video File(s)..." from the drop-down menu to load the video files you wish to burn.
Alternatively, select "File > Add Video Folder..." from the drop-down menu to choose a folder and load all the video files in the folder into the File List.
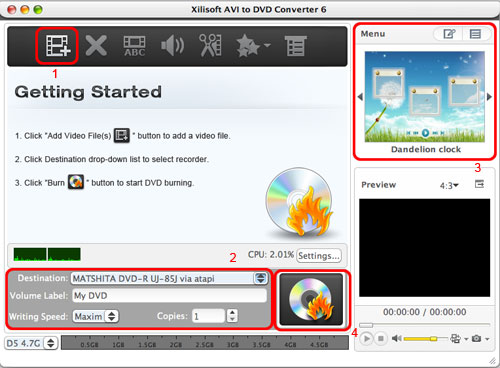
Step 2: Adjust output settings
Destination: Insert a recordable disc, and select the disc you have inserted from the drop-down list. Alternatively, choose "Save as DVD Folder" or "Save as Image (.iso)" to create a DVD folder or ISO image for the selected file(s) respectively.
Volume Label: Enter a text in the textbox to give your DVD movie a name.
Writing Speed: Choose an appropriate speed from the drop-down list according to your CPU configuration.
Copies: Click the up and down arrows or enter a number directly into the textbox to set the number of copies you wish to burn. Note: if you choose to burn more than 1 copy, then the program will prompt you to insert a new recordable disc after burning each DVD copy.
Step 3: Create DVD menu
Click the "Templates" button on the Menu panel near the top-right corner of the main interface to bring up the Menu Templates window, and then select a template for your movie.
Click the "Edit" button next to the "Templates" button to bring up the Menu Edit window, from there you can change the template, add background music/picture, title and opening film to your menu.
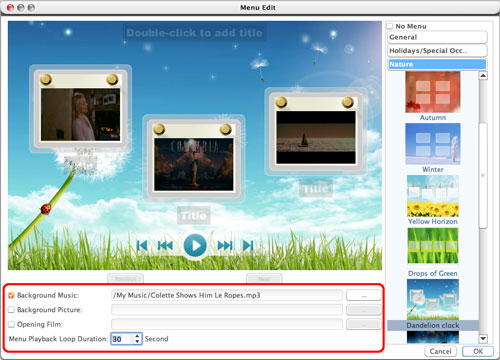
Tick the "No Menu" box if you choose not to include a menu in your movie.
Step 4: Start creating DVD
Click the "Burn" button below the File List to start burning the selected file(s).
Tips:
1. If you want customize your video file further before burning, please refer to "Part 2: Customize Video Files".
2. You can preview a video file with the built-in player at the bottom right of the main interface and take a snapshot at any time whilst previewing. To do this: select a file in the File List and click the "Play" button to play the file, when the video jumps to the image you like, click the "Snapshot" button to capture the image and save it in the snapshot folder.
1. Add subtitles
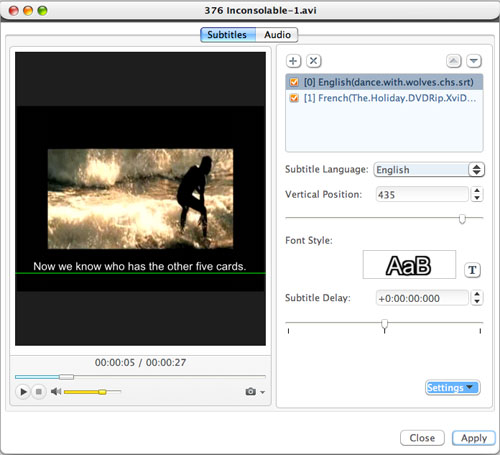
Step 1: Select a video file from the File List, and then click the "Subtitles" button on the Toolbar to bring up the Subtitles window. Click the "+" sign on the right panel and choose the subtitle file you wish to add in the dialog that opens, the subtitle file will then be displayed in the Subtitle List. You can add up to 32 subtitle files per video.
Step 2: Select a subtitle from the Subtitle List, and then choose a language from the "Subtitle Language" drop-down list. You can also adjust the vertical position and the font style of the subtitle accordingly.
Step 3: If the subtitle is not in synch with the video, you can drag the "Subtitle Delay" slider left or right, enter the delay time in the text box, or click the up or down arrow keys to increase or decrease the delay time respectively.
Step 4: If you wish to set this subtitle as the default subtitle when the DVD is played, click the up arrow key above the Subtitle List repeatedly to move it to the top of the list.
Step 5: Click "Apply" and "Close" to save the changes and return to the main interface.
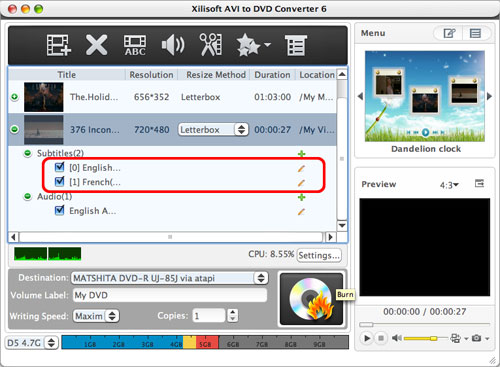
Click the "+" sign before the video file to expand its subtitle items, the subtitles you have just added will be displayed. You can add a subtitle file by clicking on the "+" sign ("Add Subtitles...") to the right of the subtitle item and edit it by clicking on the "Edit Subtitles" button.
2. Add audio tracks
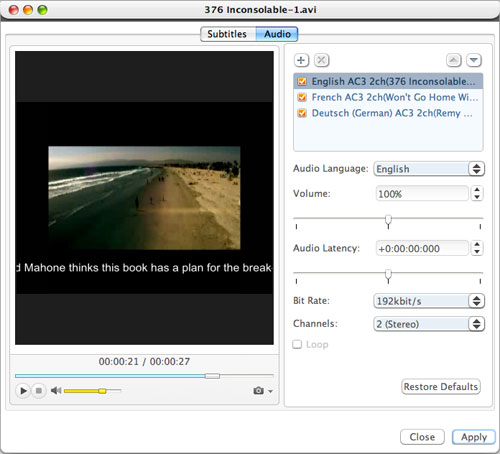
Step 1: Select a video file from the File List, and then click the "Audio" button on the Toolbar to bring up the Audio window. Click the "+" sign on the right panel and choose the audio file you want to add in the dialog that opens, the audio file will then be displayed in the Audio Track List. You can add up to 8 audio tracks per video.
Step 2: Select an audio track from the Audio Track List, and then choose a language from the "Audio Language" drop-down list. You can also adjust the volume, bit rate and channel type of the audio track accordingly.
Step 3: If the audio track is not in synch with the video, you can drag the "Audio Latency" slider left or right, enter the delay time in the text box, or click the up or down arrow keys to increase or decrease the delay time respectively.
Step 4: If you want to set this audio track as the default audio track when the DVD is played, click the up arrow key above the Audio Track List repeatedly to move it to the top of the list.
Step 5: Click "Apply" and "Close" to save the changes and return to the main interface.
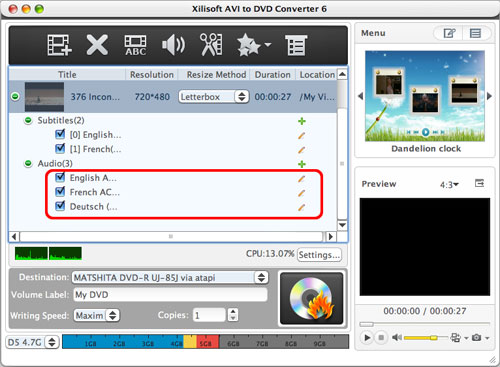
Click the "+" sign before the video file to expand its audio track items, the audio tracks you have just added will be displayed. You can add an audio track by clicking on the "+" sign ("Add Audio Track...") to the right of the audio track item and edit it by clicking on the "Edit Audio Track" button.
3. Clip video file
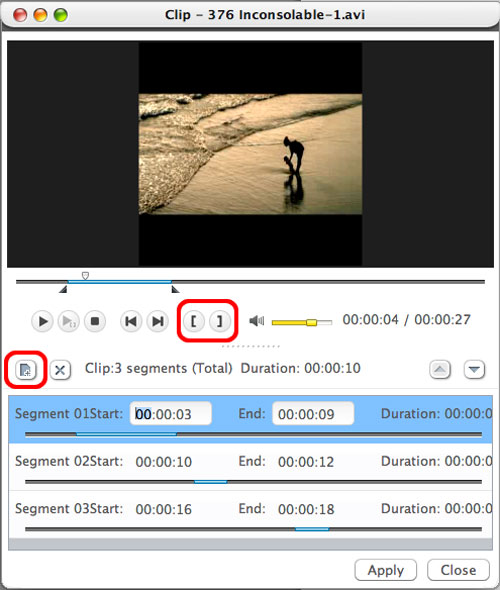
Step 1: Select a video file from the File List, and then click the "Clip" button on the Toolbar to open the Clip window.
Step 2: You can clip a segment in one of two ways:
a) Click the "Play" button to play the video. Click the "Set Start Point" button at any time to set the start point for the segment; set the segment end point by clicking "Set End Point" at any time. A new segment will then be added to the Segment List below.
b) Alternatively, scroll the video to the start point of the segment you want to clip, and then click "Set Start Point". Next, scroll the video to the end point of the segment, and then click "Set End Point". A new segment will then be added to the Segment List below.
Step 3: Click the "New Clip" button above the Segment List, and then repeat Step 2 to get a new segment. Repeat this process to extract as many segments as you want.
Step 4: Click "Apply" and "Close" to save the changes and return to the main interface. All the segments you have extracted will be merged into a new video file in place of the original one ready to be outputted.
4. Add effects
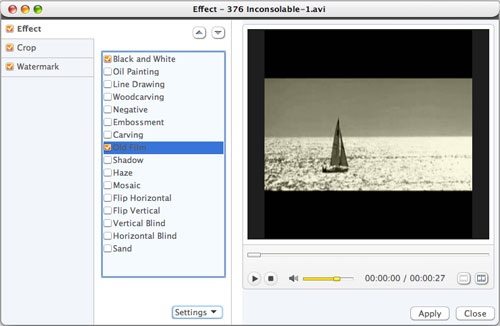
Step 1: Select a video file from the File List, click the "Effect" drop-down button, and then select the "Effect..." option from the drop-down list to bring up the Effect window.
Step 2: From the "Effect" tab, tick the effects you want from the list. Click the up and down arrows keys to adjust the order of the effects.
5. Crop video size

Step 1: Select a video file from the File List, click the "Effect" drop-down button, and select the "Crop..." option from the drop-down list to bring up the Effect window.
Step 2: From the "Crop" tab, enter the height and width of the crop area in the corresponding textboxes below the "Crop Area Size" label to set the crop area. Enter the values of Left Margin and Top Margin in the corresponding textboxes below the "Position of Crop Area" label to adjust the position of the crop area. Choose an aspect radio from the "Keep Aspect Ratio" drop-down menu.
Tip: You can also adjust the position and the size of the crop area by clicking and dragging the central and surrounding red handles in the preview window.
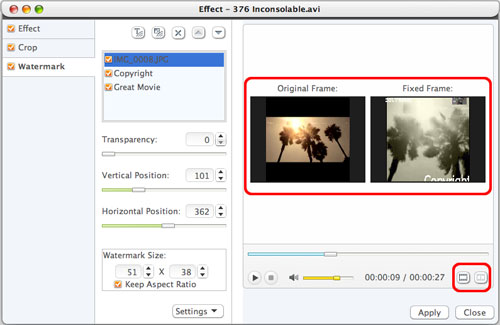
6. Add watermarks
Step 1: Select a video file from the File List, click the "Effect" drop-down button, and select the "Watermark..." option from the drop-down list to bring up the Effect window.
Step 2: To add a text watermark, click the "Add Text Watermark" button near the top of the window, and input the content of text watermark. You can also adjust various settings for your text watermark from there.

To add a picture watermark, click the "Add Picture Watermark" button, and locate a picture from your Mac as your picture watermark in the dialog that opens. You can also adjust various settings for your picture watermark.
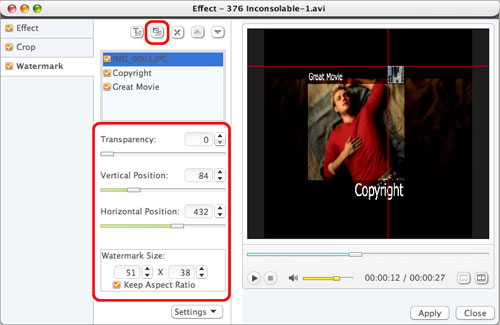
Tip: You can click the "Comparing Preview" button on the bottom left of the Effect window at any time to preview the original video and the video with various effects applied side by side in real-time.