Xilisoft iPod Magic Platinum Tutorial
This tutorial can tell you how to transfer media files between iPod/iPhone, PC and iTunes, copy DVD movies and non-iPhone videos to iPhone, make ringtone and download online videos by Xilisoft iPod Magic Platinum. And here we would like to note you that all functions of Xilisoft iPod Magic also apply to all iPod, iPhone models.
In general this article is divided several parts as below.
- Part 1: Transfer files from/to iPod/iPhone
- Part 2: Convert and transfer home DVD movie to iPod/iPhone
- Part 3: Convert and transfer any videos/audios to iPod/iPhone/iTunes
- Part 4: Download and convert online videos at one click
- Part 5: Make ringtone from any video/audio file
- Part 6: Transfer Contacts to Computer/Device
- Part 7: Backup Messages to Computer
- Part 8: More Applied Functions
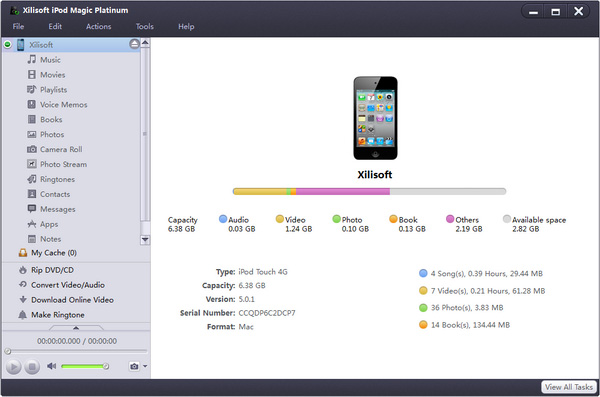
First, free download Xilisoft iPod Magic Platinum, install and run it. Connect your iPod/iPhone to computer, the application will recognize the device automatically and displays the device information in the interface.
Part 1: Transfer files from/to iPod/iPhone
I. Copy files from PC to your iPod/iPhone
This program helps you copy movies, music, books, applications and photos from local folder to iPod/iPhone without overwriting original iPod/iPhone files.
In the left directory tree, select the target device file list that you want to import files into. And then click "Add File(s) to Device" drop-down button, choose "Add File(s) to List..." option, select the files you want to add in the dialog box that appears, and load them to your device.
Tips:
(1) If you want to add a folder containing all files you want, please click "Add File(s) to Device" drop-down button, choose "Add Folder to List..." option, and then load the folder you want to your device.
(2) The program allows you to transfer files by drag and drop. You can directly drag and drop files from local into the program to import them.
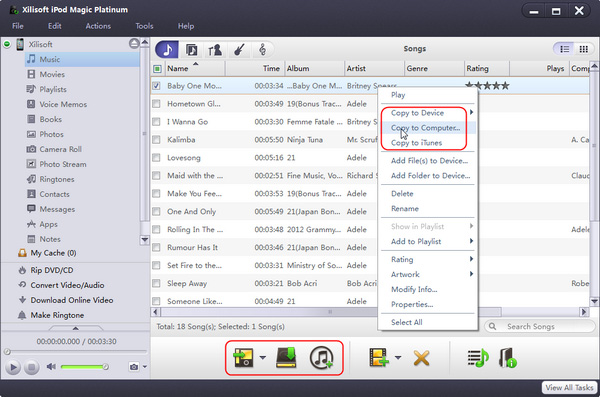
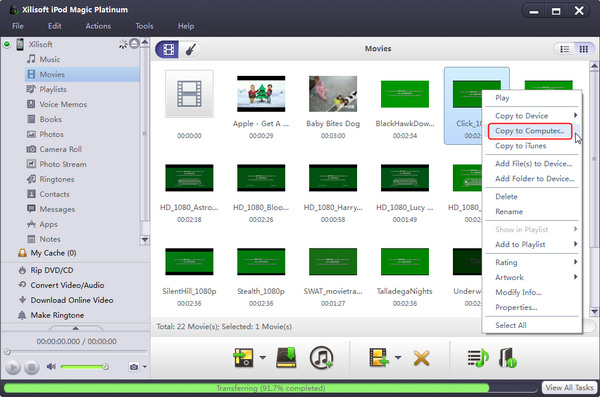
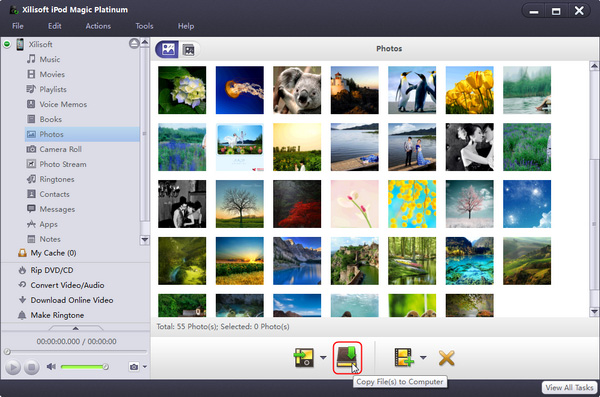
II. Backup iPod/iPhone files to local
The program helps you transfer iPod/iPhone music, movies, books, applications and photos to PC for backup.
1. In the left directory tree, choose the source file list from which you want to backup files to local. All files in the selected file list will be shown in the right list immediately.
2. Check the wanted files in the right file list, click "Copy File(s) to Computer" button at the bottom of the file list, and locate the target folder in the dialog box that appears, then start exporting.
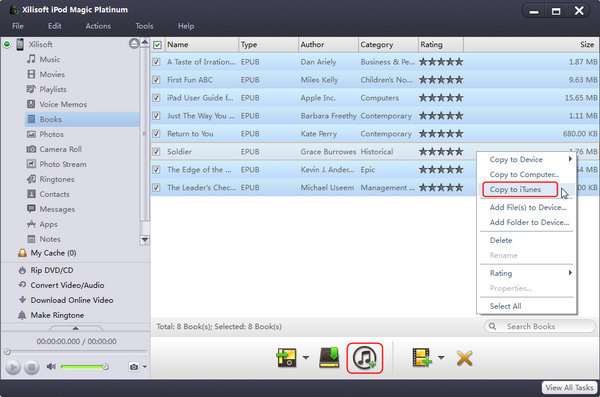
III. Transfer iPod/iPhone files to iTunes
This program allows you to transfer iPod/iPhone music, movies, books and applications to iTunes for backup.
1. In the left directory tree, choose the source music, movies, books and applications list from which you want to transfer files to iTunes. All files in the selected list will be shown in the right file list immediately.
2. Check the wanted files in the right file list, click "Copy File(s) to iTunes" button at the bottom of the file list to start transferring.
Part 2: Convert and transfer home DVD movie to iPod/iPhone
The program helps you put your loved DVD movie into iPod/iPhone by converting home DVD and transferring to iPod/iPhone.
1. Select "Convert home DVD/CD" node from the left directory tree, insert the DVD disc you want to import, and click "Open DVD" drop-down button to load the inserted DVD disc. After loading, all DVD titles will be displayed in the right file list.
Tips:
(1) Besides DVD disc, you can also load ISO/IFO files and DVD/CD folder from the "Open DVD" drop-down list.
(2) In the right file list, right click the wanted DVD title, choose "Open" option from the right-click menu to preview it in the built-in player at the left bottom of the main window. Click "Display Player" can resize the small window to larger size.
(3) You can also load multiple DVDs/CDs/Audio CDs at the same time and view all of them in the file list.
2. Check the DVD titles you want to transfer in the file list, and click "Copy File(s) to Device" button to start copying.

Tip: If you connect more than one device simultaneously, then after clicking "Copy File(s) to Device" button, the "Select Copy Destination" dialog box will pop up to ask you to choose the target device(s) you need.
Part 3: Convert and transfer any videos/audios to iPod/iPhone/iTunes
I. Copy any video/audio to iPod/iPhone
The program supports copying any videos/audios to iPod/iPhone by converting them to iPod/iPhone video/audio files and transferring them to devices in one step.
1. Select "Convert Video/Audio" node from the left directory tree, and click "Add File(s) to Convert Format" button to load video/audio files.
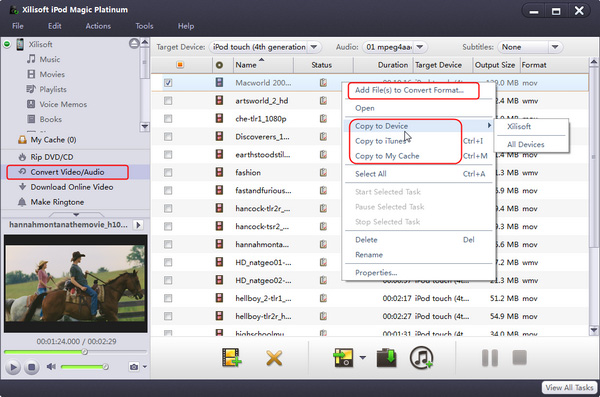
2. If you add device-incompatible files to the "Convert Video/Audio" node, the software will automatically convert them to the format you set.
Tip: If you unplug iPod/iPhone during the process of converting, the program will continue converting the files that are not converted and keep them in the "My Cache" for you to copy them to iPod/iPhone next time.
3. Check one or more videos and audios you want to transfer in the file list, and click "Copy File(s) to Device" button to start copying.
If you connect more than one device simultaneously, then the "Select Copy Destination" dialog box will pop up to ask you to choose the target device(s) you need.
Tip: In the file list, highlight the wanted file, and choose "Open" option from the right-click menu to preview it in the built-in player at the left bottom of the main window.
II. Add media files from local to iTunes
The program also supports copying videos/audios to iTunes library by converting video/audio files to iPod/iPhone files and transferring them to iTunes in one step.
1. Select "Convert Video/Audio" node from the left directory tree, and click "Add File(s) to Convert Format" button to load video/audio files.
2. If you add device-incompatible files to the "Convert Video/Audio" node, the software will automatically convert them to the format you set.
Tip: If you unplug iPod/iPhone during the process of converting, the program will continue converting the files that are not converted and keep them in the "My Cache" node for you to copy them to iPod/iPhone next time.
3. Check one or more videos and audios you want to transfer in the file list, and click "Copy File(s) to iTunes" button to start copying.
Tip: In the file list, highlight the wanted file, and choose Open option from the right-click menu to preview it in the built-in player at the left bottom of the main window.
Part 4: Download and convert online videos to iPhone at one click
This application allows you to download desired videos from the most popular online video websites and convert to iPod/iPhone compatible formats, transfer them to the device just with a few clicks. The supported online video websites include YouTube, Metacafe, Dailymotion, Revver, Vidilife, Break, Vimeo, Stickam, Blip.tv and so on.
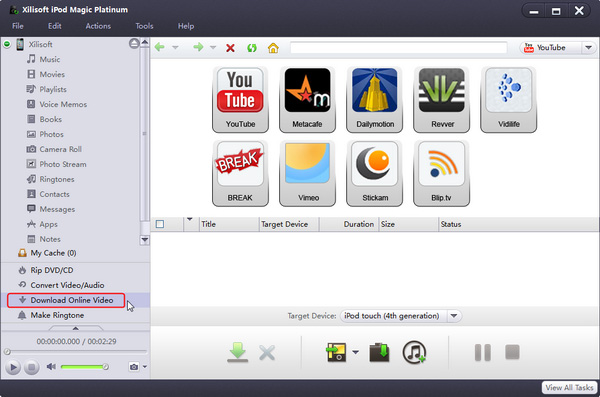
1. Click "Download Online Video" node from the left directory tree, select an interested website in the window. Click it to open its homepage and then select your favorite videos.
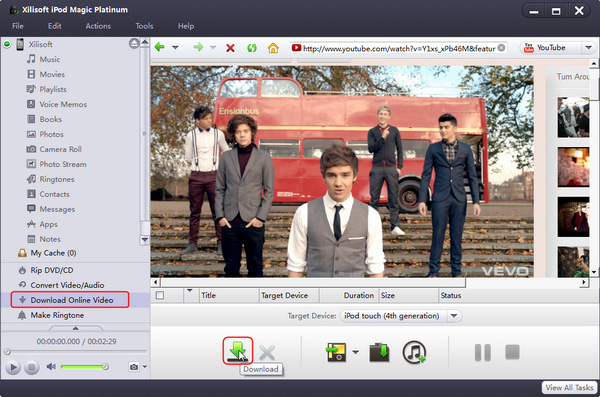
2. Click on a video to play it in the window. If you want to download videos and save them on local computer, you can click "Download" button to add the videos into the downloading file list.
Tips:
(1) You can also adjust the resolution ratio in the opening videos according to your needs to make videos clear.
(2) You can also click the drop-down button on the right browser toolbar and select websites in the drop-down list.
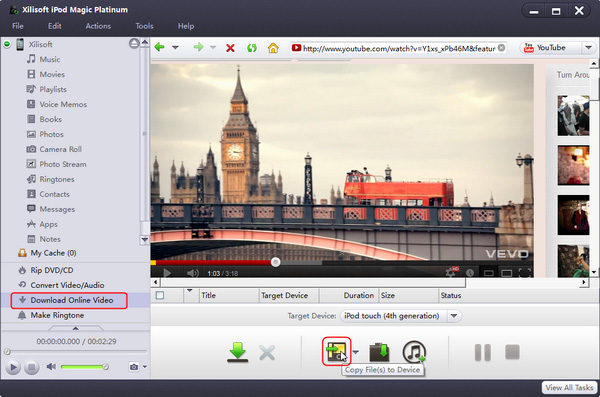
The program supports transferring downloaded videos to devices or iTunes. Please refer to "Part 1: Transfer files from/to iPod/iPhone" part to get detailed operating steps.
The software can convert almost all mainstream video/audio formats including AVI, MPEG, WMV, DivX, MP4, H.264/AVC, AVCHD, MKV, RM, MOV, XviD, 3GP, WMA, WAV, RA, M4A, MP3 to M4R ringtones, and transfer the converted ringtone to iPhone directly without iTunes after conversion if you want.
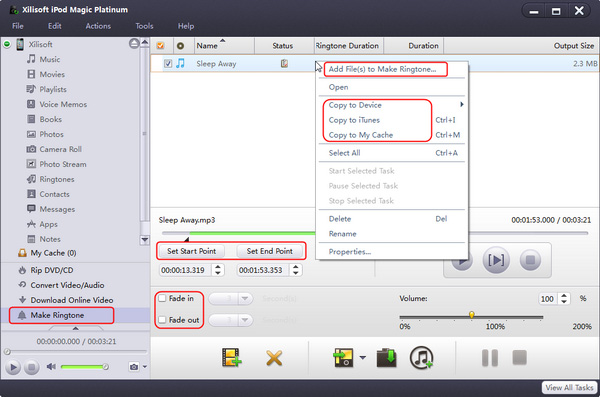
1.Select "Make Ringtone" node from the left directory tree, and click "Add File(s) to List" drop-down button to load video/audio files or a folder from the drop-down menu.
2.Select a file in the file list, and click "Play" button to hear the music before creating ringtone and find the part you want to use. Click "Set Start Point" button to set the start point in the playback. When the file jumps to the end point you want, click "Set End Point" button to get music clip to transfer.
You can transfer ringtones made by yourself to devices or iTunes directly by clicking the "copy to device/iTunes" button below.
Part 6: Transfer Contacts to Computer/Device
I. Export contacts to computer
This program helps you to export contacts from device to local computer.
1. In the left directory tree, choose the "Contacts" which you want to export contacts to local.
2. Check the wanted contacts in the right list, then click "Export Contacts to Computer" button, choose "Export to .csv File for Google Contacts", "Export to .vCard File(s)(.vcf) for Outlook" and Windows Contacts" or "Export to vCard Single File for Other Address Books" option, and locate the target folder in the dialog box that appears, then start exporting.
II. Import contacts to device
This program allows you to import contacts to device.
1. In the left directory tree, choose the target "Contacts" that you want to import contacts into.
2. Click "Import Contacts to Device" button at the bottom of the interface, choose "Import Contacts from .csv File" or "Import Contacts from .vCard File(s)" option, and choose the source contacts file in the dialog box that appears, then start importing.
Part 7: Backup Messages to Computer
It offers best solution for users to transfer SMS and iMessages from iPhone including iMessages form iPod touch and iPhone to PC to back up your important messages.
1. In the left directory tree, choose the "Messages" node which you want to export messages to local..
2. Check one or more messages, and click "Export Messages" button, you can choose "Selected Messages" or "All Messages" for exporting to computer in the dialog box. Furthermore, you can choose "Html File" or "Text File" as type of export file.
Click "OK" button to start exporting.
Part 8: More Applied Functions
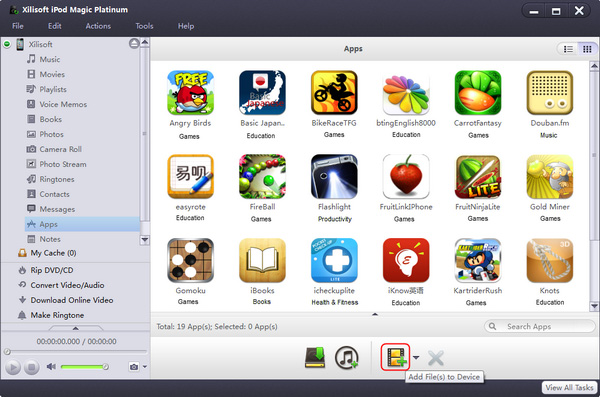
- Application documents management
The software supports document management for some applications.
Select "Apps" node from the left directory tree, and choose an application which supports documents management from the applications list in the right file list.
Click the up arrow button at the bottom to open "Documents Management" interface. Click "Add..." button to add local documents, choose the documents from list and click "Save..." or "Delete..." button to save or delete documents. - Add playlists to iTunes
You can add playlists to iTunes. Choose one device node and click "Playlists", all the playlists will be displayed in the file list. Choose one or more playlists, and click "Copy File(s) to iTunes" to start copying.
- Show media files in playlist
Choose one or more files in the file list, add the file(s) to other playlists by choosing "Add to Playlist" from right click menu.
Right click the file which has been added to the playlist; choose one playlist the file belonged from submenu of "Show in Playlist", and then it will skip to the playlist automatically. - Move media files from one playlist to another
Right click one or more media files in one playlist, and choose one playlist from submenu of "Move to Another Playlist", and then it will move to the target playlist automatically.
- Transfer files from other nodes to iPod/iPhone by dragging and dropping
You can directly transfer the added DVD/video/audio in the built-in browser to iPod/iPhone by dragging and dropping.
Choose the needed node from the left directory tree, locate the files you want to transfer
in the right file list and drag and drop them to the library or playlist of the target device.
You can also drag and drop files between your different devices for transfer. - Modify ID3 tag
You can modify ID3 tag info of one file in iPod/iPhone, and also modify ID3 tags of multiple files at the same time.
To modify ID3 tag of one audio file:
1. Locate the audio you want to edit in the right file list, and choose "Modify ID3 Info..."from the right click menu to open the "ID3 Info" window.
2. Edit any information like name, Artist, Album, Comments, Years, Genre, etc in the ID3 tags. Click "OK" to finish the editing.
To modify ID3 tags of multiple files at the same time:
1. Locate the audios you want to edit in the right file list, and choose "Modify ID3 Information..." from the right click menu to open the "ID3 Info" window.
2. If the selected files have the same value in any field, then the program will show the value in the field, you can also click the field text box to change the field for multiple files simultaneously.
If the files have different values in the Name, Artist, Album Artist, Album, Genre, Rating and Year fields, the program will show all the values in the field divided by semicolon, you can click the field text box to change the field for multiple files simultaneously. - Set the conversion profile for different devices
Click "Tools > Settings... > Rip/Convert" to open the "Rip/Convert" setting page, and choose a device type from the device list.
In the setting area below, you can set the bit rate and resolution of the video profile, as well as the target format and bit rate of the audio profile. - Adjust resolutions and download HD videos
You are free to choose the resolutions of videos and download HD videos to local computer.
Preview a HD video in built-in Browser. During the preview, click "Resolution" button and select needed resolution in the menu. Click on the "Download" button on the toolbar to create the downloading task and start downloading HD video.


